Introduction
Degreasing engine parts looks straightforward: spray, scrub, rinse. But results vary dramatically based on factors most operators overlook — degreaser chemistry, dwell time, material compatibility, and application method. Whether you're rebuilding an engine or reconditioning heavy equipment from mining, agriculture, or fleet operations, the difference between a quick job and quality work comes down to those details.
A rushed or misinformed approach causes real damage. Caustic solutions etch aluminum heads, leaving pits that compromise gasket sealing. Residual oil films invisible to the naked eye cause premature bearing wear after reassembly. Even very small abrasive particles left in oil galleries, bearing surfaces, or cylinder components can disrupt lubrication, dent contact surfaces, and accelerate wear after reassembly. Thorough rinsing, passage cleaning, and final inspection are therefore essential before an engine is returned to service.
This guide covers what you need: a clear step-by-step process, the key variables that determine results, and the mistakes that lead to failure. If you're working on farm equipment caked with field grease, fleet trucks loaded with road grime, or construction machinery running 12-hour shifts in harsh conditions, this is your roadmap to getting parts genuinely clean.
TL;DR
- Degreasing removes oil, grease, carbon, and grime — essential before machining, inspection, or reassembly
- Always cool the engine and protect electrical components before applying any degreaser
- Choose the degreaser based on the manufacturer’s material-compatibility guidance, not pH alone. For aluminum and mixed-metal assemblies, use a product explicitly rated for those surfaces and follow its dilution, temperature, and dwell-time limits. Strong, uninhibited caustic cleaners can attack aluminum, while ferrous parts may tolerate stronger chemistry when the cleaner is approved for that application.
- Dwell time and agitation are the most commonly skipped steps—both are critical for breaking down heavy industrial grease
- Rinse with low-to-moderate pressure and dry thoroughly to prevent flash rust and re-contamination
What You Need to Degrease Engine Parts
Having the right materials before you start directly determines the quality of the clean. Improvising mid-job leads to incomplete degreasing or part damage.
Equipment and Supplies
Essential Equipment:
- Engine degreaser (solvent-based, water/citrus-based, or industrial-grade)
- Stiff non-metallic brushes (never wire brushes on aluminum)
- Plastic bags and electrical tape for masking sensitive components
- Microfiber towels for drying
- Garden hose or low-pressure sprayer for rinsing
- Personal protective equipment (gloves, goggles, protective clothing)
For Shop Environments:
- Parts washer or hot tank
- Pressure washer with adjustable nozzle
- Compressed air source for drying galleries and blind holes
For Heavy Industrial Applications:
Heavy grease, oil, tar, asphalt, and field grime may require an industrial degreaser formulated for equipment and metal parts. Z99 Safety Solvent Degreaser uses citrus-based micro-micellular technology to penetrate and emulsify grease and grime. Zircon describes it as biodegradable, non-corrosive, petroleum-distillate-free, and safe for all metals.
Review the Z99 Safety Solvent Degreaser before use. The product is flammable and should not be applied to hot surfaces or energized electrical components. Test painted surfaces, plastics, rubber, seals, and adhesives before full application.
Degreaser Selection by Part Material
Once you have your equipment ready, match your degreaser to the part material — using the wrong formula can damage surfaces or leave residue.
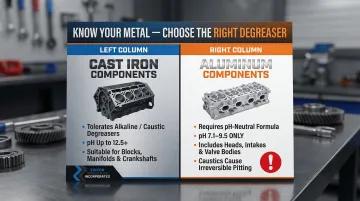
Cast Iron Components:
- Tolerates alkaline or caustic-based degreasers
- Can handle higher pH solutions (up to 12.5+)
- Suitable for blocks, manifolds, crankshafts
Aluminum Components:
- Requires pH-neutral or non-caustic formula (pH 7.1–9.5)
- Includes heads, intakes, timing covers, valve bodies
- High-pH caustic solutions cause irreversible pitting, discoloration, and surface degradation
The natural oxide film on aluminum is soluble in alkaline solutions. Strong alkaline cleaners will attack and destroy a bare machined aluminum surface, altering critical tolerances.
How to Degrease Engine Parts: Step-by-Step
Step 1: Cool Down the Engine and Set Up Your Work Area
Never degrease a hot engine. Hot surfaces can accelerate solvent evaporation, increase vapor and ignition risks, and cause the cleaner to dry before it has worked effectively. Rinsing hot components with cold water may also create thermal stress. Allow the engine and surrounding parts to cool fully before cleaning, and follow the cleaner’s SDS fire-safety precautions.
Work Area Setup:
- Work in a ventilated space to prevent vapor accumulation
- Lay down absorbent mats or drip pans to contain runoff
- Check local regulations on degreaser wastewater disposal before starting—this is especially critical for shops generating regular waste streams
Spent degreaser and wash water must be evaluated as an actual waste stream before disposal. Under EPA hazardous-waste rules, an aqueous waste may exhibit the D002 corrosivity characteristic if its pH is at or below 2 or at or above 12.5. Oil, metals, solvents, and other contaminants can create additional waste-management requirements, so shops should follow federal, state, local, and wastewater-discharge rules.
Step 2: Protect Sensitive Components
Use plastic bags and electrical tape to seal off:
- Battery terminals
- Alternator
- Fuse box and relays
- Sensors (MAF, O2, throttle position)
- Exposed wiring connectors
- Spark plug openings
- Air intake filter
- Distributor (on older engines)
For Disassembled Parts:
Position components so degreaser and rinse water drain completely away from blind holes, oil galleries, and threaded recesses. Trapped water causes flash rust on cast iron and contaminates new oil on reassembly.
Step 3: Apply the Degreaser
Application Technique:
- Spray or brush degreaser generously onto all surfaces
- On installed engines, work bottom-up so runoff doesn't drip on you
- On individual parts, coat all surfaces evenly including recessed areas, bolt holes, and mating surfaces
Dwell-Time Guidance:
Follow the cleaner manufacturer’s stated dwell time rather than using one universal schedule. Keep the surface wet during the permitted contact period, agitate stubborn deposits, and reapply if necessary. Do not allow the cleaner to dry on paint, aluminum, plastic, rubber, seals, or other sensitive surfaces.
For heavy contamination, repeat the cleaning cycle instead of automatically extending the dwell time beyond the label instructions.
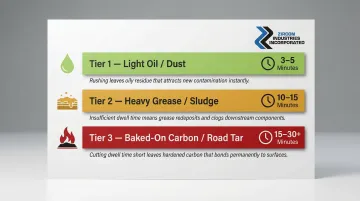
Insufficient dwell time leaves residual oil films that interfere with gasket sealing, bearing seating, and surface coatings — don't rush this step.
Step 4: Agitate and Scrub
For heavily soiled parts, agitation is what separates a surface clean from a thorough one. Use a stiff non-metallic brush to work the degreaser into:
- Caked deposits
- Bolt cavities
- Cooling fins
- Valve areas
- Oil galleries
- Threaded bores
Brush selection matters: avoid metallic brushes on aluminum — they scratch surfaces and embed ferrous particles that contaminate cleaned parts. A long-handled parts brush reaches deep recesses on blocks and cylinder heads, while a toothbrush-style brush handles galleries, threads, and tight corners.
Step 5: Rinse and Dry Thoroughly
Rinsing Technique:
- Use a garden hose on stream or low-pressure setting
- Never use high-pressure jets directly on electrical connections, sensors, or carburetor/injection components
- Water intrusion causes corrosion and electrical faults
- For standalone parts, a parts washer rinse cycle or controlled hot water rinse improves results
Once rinsed, drying must happen immediately — don't leave parts sitting wet. Flash rusting starts within minutes on bare iron or steel in humid conditions, and moisture trapped in oil passages or under gasket faces leads to rust and contaminated fresh oil.
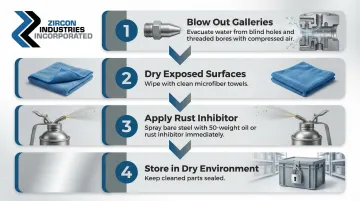
Drying Protocol:
- Use compressed air to evacuate water from galleries, blind holes, and threaded bores
- Dry exposed surfaces with clean microfiber towels
- Immediately protect bare ferrous surfaces with a clean rust preventative or preservation lubricant approved for the component and the next assembly or machining step. Keep gasket faces, friction surfaces, bonding areas, and surfaces awaiting paint or coating free from unapproved oil films.
- Store cleaned parts in a dry environment
Key Variables That Affect Degreasing Results
Degreasing failures are almost never about effort—they're about mismatched variables. Understanding what controls the outcome lets you dial in the process rather than scrub harder and hope for the best.
Degreaser Chemistry and Concentration
The surfactant type and concentration determine how effectively a product emulsifies oil and grease. Under-diluted water-based degreasers won't penetrate heavy buildup. Over-concentrated caustic solutions etch aluminum or degrade rubber seals.
Matching degreaser chemistry to both the contamination type (petroleum grease, synthetic oil, carbon deposits, road tar) and the part material is the single biggest factor in cleaning outcome. A wrong choice means either re-cleaning or part damage.
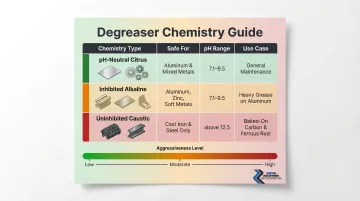
| Cleaner Type | Typical Application | Important Compatibility Checks |
|---|---|---|
| Aluminum-safe aqueous cleaner | Aluminum and mixed-metal components | Confirm alloy compatibility, dilution, temperature, and maximum dwell time |
| Citrus or solvent degreaser | Grease, oil, tar, and grime on engines and metal parts | Review the SDS for flammability and test paints, plastics, rubber, seals, and adhesives |
| Caustic hot-tank cleaner | Fully disassembled ferrous components | Do not use on aluminum, zinc, or other soft metals unless the specific inhibited formulation is approved for them |
Dwell Time
Most operators rinse too quickly. Degreaser chemistry requires contact time to break molecular bonds between the oil film and metal surface. Rushing this step leaves a thin, invisible grease film that only becomes apparent when parts are machined, assembled, or coated.
That residual film causes real problems: it interferes with gasket sealing, bearing seating, and surface coatings. In non-destructive testing environments, insufficient dwell time prevents penetrant from filling discontinuities, leading to inspection errors.
Water Temperature (in Hot Tank or Pressure Washer Applications)
Operating temperature, concentration, and immersion time depend on the specific parts washer, cleaning chemistry, and component material. Follow the equipment and chemical manufacturer’s operating limits rather than applying one temperature or concentration range to every aqueous washer or hot tank.
Aluminum and other soft-metal components require a chemistry and operating window explicitly approved for those materials.
Part Material and Surface Condition
Porous cast iron holds grease in microscopic voids differently than smooth aluminum does. Corroded or painted surfaces need a different approach than freshly machined metal—and using the same method across all surface types is a common source of incomplete cleaning.
Parts with old paint, heavy corrosion, or heat-baked deposits often require a two-stage process: degrease first, then follow with abrasive cleaning or a second soak before the surface is genuinely clean.
Common Mistakes When Degreasing Engine Parts
Even a sound degreasing process can go wrong at the details. These four mistakes account for most of the damage and rework seen in shop and field environments.
Skipping cool-down and masking: Applying degreaser to a warm engine or leaving electrical components unprotected creates safety hazards and risks component damage. High-volume shops under time pressure skip this most often — and pay for it later.
Using the wrong degreaser on the material: Strong caustic or high-pH degreasers cause irreversible pitting and oxidation on aluminum parts. Check pH and material compatibility before pulling anything off the shelf. Grabbing whatever is available destroys machined tolerances.
Directing high pressure at sensitive areas: A high-pressure nozzle aimed at sensors, wiring connectors, or the alternator forces water past seals and into electrical contacts. Corrosion failures from this mistake often appear days or weeks later and are hard to trace back to the cleaning step.
Leaving residual moisture before reassembly: Moisture trapped in oil passages, on bearing surfaces, or under gasket faces causes flash rust on cast iron and emulsifies fresh oil. Blow out galleries and blind holes with compressed air — every time.
Alternative Degreasing Methods for Engine Parts
Spray degreasing works well for most situations, but certain parts, contamination levels, or shop contexts call for a different primary method.
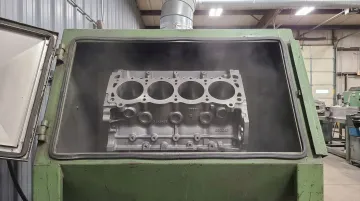
Hot Tank Soaking
Ideal for fully disassembled cast iron components — blocks, heads, manifolds — with heavy accumulated grease, baked-on carbon, or old gasket residue that spray degreasing cannot penetrate quickly.
Operating temperature, concentration, and immersion time depend on the specific parts washer, cleaning chemistry, and component material. Follow the equipment and chemical manufacturer’s operating limits rather than applying one temperature or concentration range to every aqueous washer or hot tank.
Aluminum and other soft-metal components require a chemistry and operating window explicitly approved for those materials.
Key trade-offs to consider:
- Requires specialized equipment and caustic solutions monitored for concentration and pH
- Aluminum parts need either a separate lower-temperature bath or different chemistry to avoid damage
- Spent caustic solutions may trigger EPA RCRA hazardous-waste requirements depending on the characteristics of the actual waste stream
- Waste disposal carries regulatory requirements and liability
Ultrasonic Cleaning
Best suited for precision small components — carburetors, injectors, valve bodies, bearing housings — where cavitation cleaning removes contamination from blind passages and micro-recesses that brushes and spray cannot reach.
Frequency Selection:
- 20–40 kHz: Larger cavitation bubbles for robust parts like engine blocks, heavy grease removal
- 60–130 kHz: Smaller bubbles for delicate items with thin-wall geometries, fuel injectors, valve bodies
Worth noting before committing to ultrasonic cleaning:
- Equipment cost is higher than a basic parts washer
- Most effective as a secondary step after spray degreasing removes bulk grease
- Not practical for large parts like full engine blocks
Abrasive/Blast Cleaning
Used as a finishing step after degreasing to remove surface rust, scale, old paint, or baked-on carbon from cast iron or steel parts. Common in engine rebuilding shops preparing blocks and heads for machining or coating.
Media Selection:
| Media Type | Potential Use | Major Restrictions |
|---|---|---|
| Glass beads | Controlled exterior finishing of suitable castings | Avoid bearing journals, cylinder bores, gasket faces, threads, and internal passages; retained media can cause engine damage |
| Plastic media or walnut shells | Paint and coating removal from approved exterior surfaces | Confirm substrate compatibility and control combustible dust |
| Aluminum oxide | External ferrous surfaces requiring aggressive scale or rust removal | Too aggressive for aluminum, precision-machined surfaces, bearing areas, and internal engine passages |
Abrasive media — glass bead, plastic media, aluminum oxide — must be completely removed from all oil passages and recesses before assembly. Even small residual particles cause rapid bearing failure.
Glass bead is particularly risky: it tends to lodge in internal passages and only shakes loose once the engine starts, leading to piston ring or bearing damage within the first few thousand miles.
Do not rely on plugs alone to protect internal oil and coolant passages. Abrasive blasting should be limited to surfaces covered by a validated engine-rebuilding procedure. Precision-machined surfaces, bearings, journals, bores, threads, and internal galleries must be isolated from media, followed by documented cleaning and inspection before assembly.
Abrasive cleaning should never substitute for chemical degreasing on oily parts.
For fleet, agriculture, construction, mining, and industrial maintenance teams dealing with heavy grease, oil, tar, asphalt, and grime, Z99 Safety Solvent Degreaser provides citrus-based micro-micellular cleaning for engines, equipment, and metal parts. It is biodegradable, non-corrosive, petroleum-distillate-free, and listed as safe for all metals.
Always review the Z99 Safety Solvent Degreaser before use. The product is flammable and should be kept away from hot surfaces, sparks, flames, and energized electrical components. Contact Zircon Industries at 800-547-4328 for product and bulk-order guidance.
Frequently Asked Questions
Is it safe to use a degreaser on engine parts?
Yes, degreasers can be safe when used correctly and when the formulation is compatible with the component material. Safety properties vary significantly by formulation. Some aqueous degreasers may be non-flammable, while citrus-solvent products can be flammable and may present skin, eye, sensitization, or aspiration hazards. Always review the product label and SDS, use the required PPE and ventilation, and keep flammable cleaners away from ignition sources.
Where should you not spray degreaser on an engine?
Avoid the alternator, battery terminals, fuse/relay box, sensors, exposed wiring connectors, spark plug boots, air intake filter, and distributor (on older engines). These areas should be masked with plastic bags and tape before any degreaser or rinse water is applied to prevent water intrusion and electrical corrosion.
What is the best degreaser for engine parts?
The best degreaser depends on the application. Water- and citrus-based degreasers are safe for aluminum and general use. For heavy grease, oil, tar, asphalt, and grime on engines and industrial equipment, Z99 Safety Solvent Degreaser is a biodegradable, non-corrosive citrus cleaner that Zircon lists as safe for all metals. Test rubber, seals, plastics, paint, and adhesives in an inconspicuous area before full application.
Is WD-40 good for cleaning engine parts?
WD-40 Multi-Use Product should not be used as a substitute for a dedicated engine degreaser because it is designed primarily for lubrication, penetration, corrosion protection, and moisture displacement, and it leaves a protective film. However, WD-40 also sells separate Specialist cleaning and degreasing products, so always identify the exact product rather than referring to the entire brand.
How long should degreaser sit on engine parts before rinsing?
Follow the cleaner manufacturer’s stated dwell time rather than using a universal schedule. Keep the surface wet during the permitted contact period, agitate stubborn deposits, and do not allow the cleaner to dry on the surface. For heavy contamination, repeat the cleaning cycle instead of automatically exceeding the label’s maximum contact time.
Can you degrease engine parts without removing them from the engine?
Yes, many engine parts can be degreased in place using spray degreasers on the installed engine. However, fully removing parts allows more thorough cleaning, better access to oil galleries, and safer rinsing away from electrical components. For precision work or rebuilds, remove parts whenever possible.