Road maintenance managers, contractors, civil engineers, and township officials all deal with the same consequence of a failed base: rutting, potholes, washboarding, frost heave, and reflective cracking that resurfaces no matter how many times the road is patched. The fix isn't on the surface — it's below it.
Despite widespread use, road base stabilization is frequently misunderstood at the operational level. Teams confuse it with soil stabilization, skip additive selection testing, or miss the two steps that cause the most failures: moisture control and density verification.
This guide covers the full process — from site assessment through wearing surface application — with practical detail on additive selection, compaction sequencing, and quality control.
Key Takeaways
- Road base stabilization blends agents into existing material in-place — no excavation, no hauling, no full reconstruction
- The six core steps are: site assessment, pulverization, additive mixing, shaping, compaction, and curing
- Additive selection depends on plasticity index, gradation, and organic/sulfate content — not convention
- Moisture at or near optimum is the single most critical variable for achieving target density
- Base stabilization can reduce costs by 20–40% while extending pavement life by up to 25 years
What Is Road Base Stabilization?
Road base stabilization uniformly mixes stabilizing agents into an existing aggregate base layer to produce a stronger, homogeneous composite material. This builds structural integrity in place, with no need to remove and replace the existing base.
The process targets specific outcomes: higher load-bearing capacity, reduced permeability, resistance to deformation, and longer pavement life.
How It Differs from Related Processes
Contractors often confuse two related terms with road base stabilization:
Base stabilization treats the aggregate base layer that supports the roadway. Soil stabilization treats the native subgrade beneath that base. The equipment and methods can overlap, but the distinction is the layer being improved.
Full-depth reclamation (FDR) pulverizes the asphalt surface and underlying base together to create a new homogeneous base. Base stabilization may be part of that process, but FDR is the broader reconstruction method.
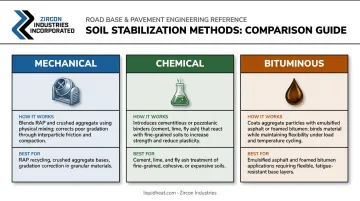
The Three Stabilization Methods
| Method | How It Works | Best For |
|---|---|---|
| Mechanical | Improves gradation by blending RAP, crushed aggregate, or crushed concrete | Material with poor gradation, no chemical reaction needed |
| Chemical | Cement, lime, or fly ash reacts with soil or aggregate particles to improve strength and stiffness | Fine-grained, granular, or mixed materials where lab testing confirms compatibility |
| Bituminous | Emulsified asphalt or foamed bitumen coats and binds aggregate | Broad soil types where flexibility matters more than rigidity |
The Three Stabilization Methods
Why Road Base Stabilization Matters
Rutting, potholes, washboarding, frost heave, reflective cracking, and alligator cracking often point to problems below the surface. Alligator cracking is a clear example: it commonly develops when the pavement lacks adequate support from the base, subbase, or subgrade, especially when poor drainage weakens the structure over time.
The financial argument for proactive stabilization is straightforward. In one FHWA example, full-depth reclamation cost $7.25/m² compared to $16.12/m² for conventional reconstruction — less than half the listed cost. The same FHWA chapter also notes that recycled pavement sections required crack maintenance approximately every 8 years versus every 4 years for standard mill-and-overlay work.
Road base stabilization is used most heavily by:
- County and municipal road authorities managing aging secondary roads
- Mining and quarry haul road operators running high axle loads on unpaved surfaces
- Rural construction contractors rebuilding failed roads with limited reconstruction budgets
- Private infrastructure managers needing durable surfaces without full reconstruction costs
It applies equally to paved and unpaved environments. The method and additive selection shift based on surface type, existing material, and load requirements — which is exactly what the next section covers.
How to Perform Road Base Stabilization: Step-by-Step
The core sequence: existing roadway material is pulverized, a stabilizing agent is incorporated and mixed in, the material is shaped to grade, compacted to target density, cured, and then topped with a wearing surface.
Step 1: Site Assessment and Pre-Construction Review
Before any equipment moves, the crew evaluates existing pavement and base conditions through core samples and soil surveys. Key data collected:
- Base composition and depth of failure
- Plasticity index (PI), gradation, and moisture content
- Underground utility locations
- Target treatment depth and specified additive percentage
This step determines whether the project will work. Without it, crews are guessing on additive type, rate, and depth — and those guesses show up as failures after paving.
Step 2: Pulverization
A self-propelled reclaimer pulverizes the existing pavement and base to the specified depth. Typical treatment depth runs 6 to 12 inches per Iowa SUDAS guidance, though some projects extend to 18 inches depending on failure depth.
Forward speed controls output gradation. Moving too fast leaves large asphalt chunks that resist compaction and create voids. Depending on the project, pulverization and additive distribution can occur in a single pass or require multiple passes.
Step 3: Adding and Mixing the Stabilizing Agent
Crews distribute additives via:
- Calibrated bulk spreader — for dry powders like cement or lime
- Distributor truck — for liquid or slurry applications
- Computerized injection system mounted on the reclaimer — for liquid additives with automated rate control
Water is added during this step to reach optimum moisture content. Moisture acts as a lubricant that allows aggregate particles to compact and interlock properly.
Additive content is specified as a percentage of dry mass. Rates vary significantly by additive type: Iowa SUDAS lists 3–6% for Portland cement, 2–6% for hydrated lime, and 8–14% for Class C fly ash in FDR applications. Deviating from the specified rate in either direction reduces final strength.
For cement-based FDR, many specifications require compaction to finish within 2 hours of mixing. Confirm the project specification before scheduling passes, because the workable window can close faster than crews expect.
Step 4: Shaping and Grading
After the stabilizer is mixed in, a motor grader shapes the material to the required profile, cross-slope, and crown. This step allows for grade corrections, slope improvements, and shoulder construction that overlays cannot achieve.
Step 5: Compaction and Density Verification
Standard compaction sequence:
- Breakdown rolling — single-drum vibratory or pad-foot roller
- Intermediate rolling — pneumatic-tire roller
- Finish rolling — smooth drum roller in static mode
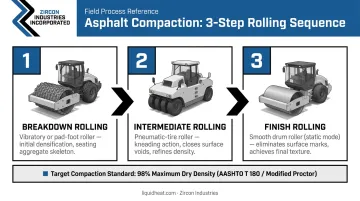
Roller size scales with treatment depth. Most specifications require compaction to at least 98% of maximum dry density, verified with a nuclear density gauge immediately behind the machine — not after the base has set and corrections are no longer possible.
Step 6: Curing and Wearing Surface Application
Curing requirements vary by additive and project specification:
- Cement-based: Keep the surface moist or protect it with an approved curing seal until the stabilized layer develops sufficient strength
- Lime-based: Maintain moisture during curing and protect the treated layer from drying, traffic damage, or premature surface sealing
Do not trap moisture beneath a surface treatment before curing is complete.
Common wearing surface options include:
- Chip seal
- Slurry seal
- Micro surfacing
- Cold-mix overlay
- Hot-mix asphalt
When traffic must reopen before final paving, a fog seal works as a breathable interim layer that protects the base without trapping moisture.
Choosing the Right Stabilizing Additive
The overriding rule: soil type drives additive selection. No single additive works for all conditions. A qualified engineer and pre-project soil testing should make this call — field conditions vary too much for a one-size-fits-all approach.
Lime
- Best suited for fine-grained soils with PI > 20 and more than 25% passing the No. 200 sieve
- Lime modifies clay by reducing plasticity and improving workability; strength gain develops over time through cementitious reactions
- Cementation is gradual — lime-treated material needs time to develop strength
- Avoid where sulfate levels exceed 3,000 ppm; calcium-based additives can cause sulfate-induced heave
Cement and Fly Ash
- Cement works well for granular and sandy soils with PI < 20 and sulfate levels below 3,000 ppm
- Organic content above 2% can prevent hardening — high organics require removal or significantly higher cement rates
- Class C fly ash is self-cementing in the presence of water; Class F fly ash requires an activator (lime or cement) to develop strength
- Compaction window is tight: 2 hours for cement, up to 6 hours for some fly ash types
Bituminous and Hygroscopic Stabilizers
Where cement and lime depend on chemical reactions with the soil matrix, bituminous stabilizers take a different approach. Emulsified asphalt and foamed bitumen coat and bind aggregate particles, improving flexibility and waterproofing across a broader range of material types. FHWA notes that asphalt emulsions also rejuvenate aged binders in reclaimed pavement.
Hygroscopic stabilizers — including calcium chloride and magnesium chloride products — attract and retain moisture, helping unpaved surfaces stay dense, compacted, and dust-controlled. Zircon Industries' RDS38 Road Dust Stabilizer fits this role on active industrial and haul roads: it controls both existing dust and new dust stirred up by traffic while helping preserve the moisture balance that road-base performance depends on. It should be positioned as a moisture-retention and dust-control stabilizer, not as a replacement for engineered cement, lime, or FDR design where structural capacity must be rebuilt.
Multiple agents are sometimes combined — lime pre-treatment to reduce clay plasticity followed by emulsion for strength gain, for example. Always verify agency or project specifications before procurement.
Key Factors That Affect Stabilization Results
Moisture Content
Optimum moisture is the single most critical variable. Too little moisture reduces lubricity and prevents adequate compaction. Too much creates hydraulic pressure that pushes particles apart, increasing voids and reducing density.
Project specifications define the acceptable moisture range around optimum, and cement-based FDR specifications are often tighter than general field rules. The Proctor compaction test (AASHTO T 180) establishes the moisture-density relationship for each specific material — this curve is the reference point for every compaction decision on the project.
Additive Calibration
Equipment must be properly calibrated and operated at consistent depth and speed. An uneven pass creates zones of over-treatment and under-treatment in the same lift. This is as much a training issue as an equipment issue: operators need to recognize what poor calibration looks like in the field before it shows up as a density failure.
Drainage Design
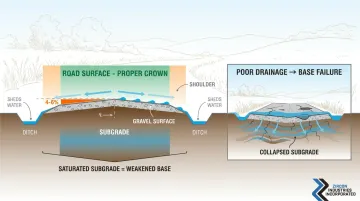
Poor drainage is the primary long-term cause of base failure, no matter how well stabilization was performed. The road must have appropriate crown, shoulder grading, and ditch design. Water infiltrating from the surface or sides will eventually undermine even a well-constructed stabilized base.
Quality Control Frequency
Density testing must occur at intervals defined by project specifications. Any anomaly — a low reading, an inconsistent area — must be investigated and corrected before the project advances. Standard on-site QC tools for catching these issues include:
- Nuclear density gauge readings for real-time compaction data
- Oven-dry moisture content checks to verify material is within spec
Common Mistakes and When Stabilization May Not Apply
Misconceptions to Avoid
Three assumptions consistently lead to failed stabilization projects:
- Exceeding the optimum additive rate produces a brittle, over-rigid matrix that cracks the wearing surface — lab testing must confirm the correct percentage before construction begins
- Stabilizing only the base when the subgrade has failed — saturated native soil or lost bearing capacity underneath — doesn't fix the root problem; a structural investigation must identify the actual failure source first
- Applying cement to incompatible soils — high organic content or sulfate levels above 3,000 ppm interfere with cement's chemical reactions, causing swell and heave rather than strength gain
When Stabilization May Not Be the Right Choice
- Existing base material is too thin to pulverize adequately at the required depth
- Traffic loads exceed the structural capacity achievable through stabilization — full reconstruction is required
- Environmental regulations restrict chemical additive use near waterways or sensitive soils
- Organic content or sulfate levels make chemical stabilizers incompatible with the existing material
Frequently Asked Questions
What is the difference between base stabilization and full-depth reclamation?
Base stabilization improves the existing base layer in-place using additives to increase structural capacity. Full-depth reclamation pulverizes the entire asphalt surface and base together to form a new homogeneous base. FDR typically incorporates base stabilization as part of its process, but the terms are not interchangeable.
Should you wet the road base before compacting?
Moisture must be at or near optimum before compaction begins. If the base is too dry, add water so particles have the lubricity needed to compact tightly. When a hygroscopic stabilizer like calcium chloride or RDS38 is used, follow the manufacturer's application guidance and site conditions; the product helps retain moisture after application, but it does not eliminate the need to start with a properly prepared road surface.
Is road base better than gravel?
Road base, a graded aggregate mix of coarse and fine particles, usually provides better load distribution and compaction than loose gravel. The varied particle sizes fill voids and lock together under compaction. For high-traffic or heavy-load applications, stabilized road base is typically the stronger option because it is designed to hold structural integrity under repeated loading.
How much does 1 ton of road base cover?
Coverage depends on compacted depth and material density. Supplier estimates range from 50 to 60 square feet per ton at 4 inches compacted depth. These are planning references only — actual yield varies with aggregate gradation, moisture, and compaction. Use a material supplier's calculator for project-specific quantities.
How long does a stabilized road base last?
Full-depth base stabilization can provide up to 25 years of life extension, with performance often limited by the surface course rather than the stabilized base itself. A PCA study of more than 75 cement-stabilized FDR projects — with an average project age of 9 years and the oldest at 26 years — found no evidence of premature structural failure in the sections it evaluated.